- Scanner
- Phone
- SwiftLeads
- Event Creator
- SwiftLeads App for Android
- SwiftLeads App for iPhone
- Mobile Web App
- Onsite Inventory
- Aventri
- Reporting Portal
- Management Portal
- User Management
- Licenses
- Map Your Show
- Registration Data Matcher
- Purchase Orders
- Setup File Types
- Integrations
- Other
Scanner
-
Turning on the Scanner
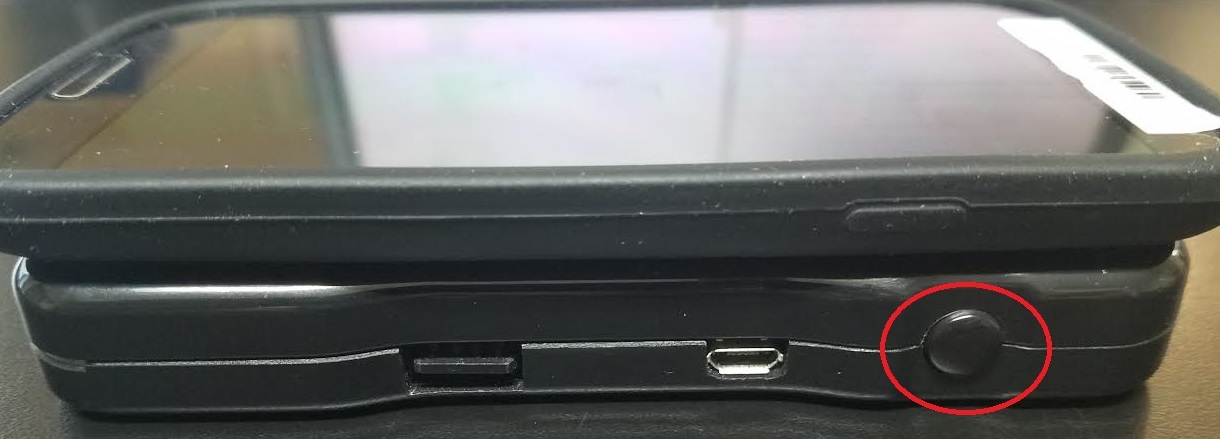
To turn on the scanner, simply press either black button found on the sides of the scanner. Once the scanner is on, the laser will flash once. Do not at any time point the laser toward your eyes.
-
Charging the Scanner
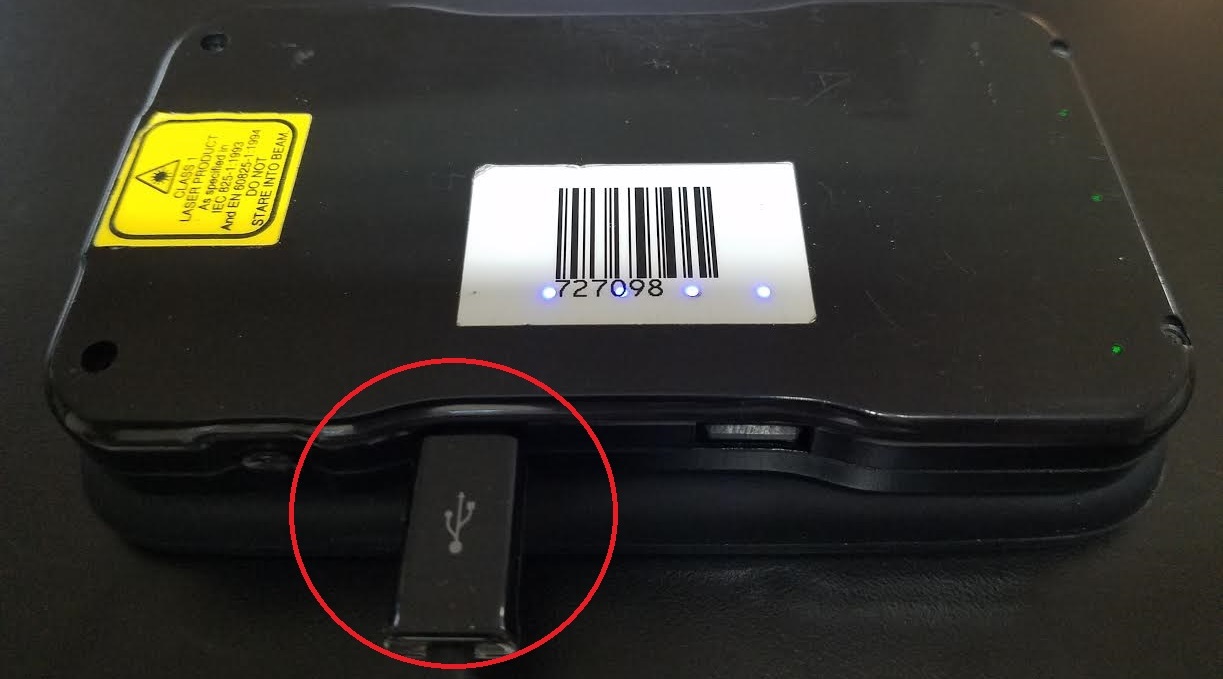
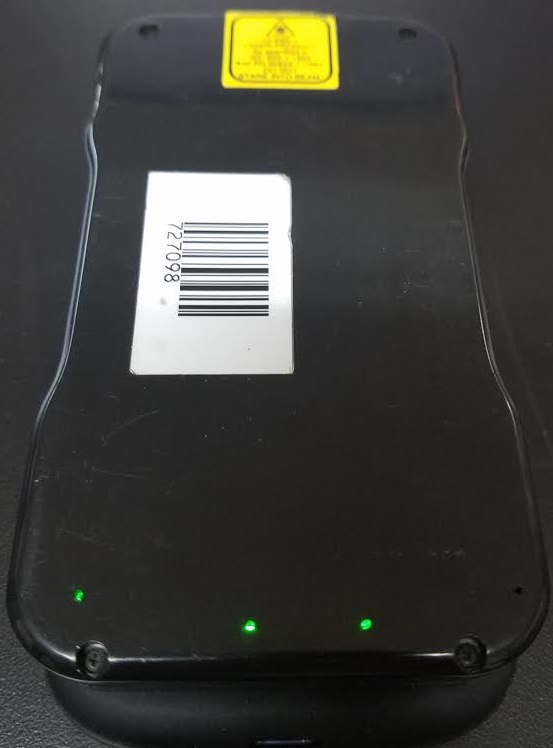
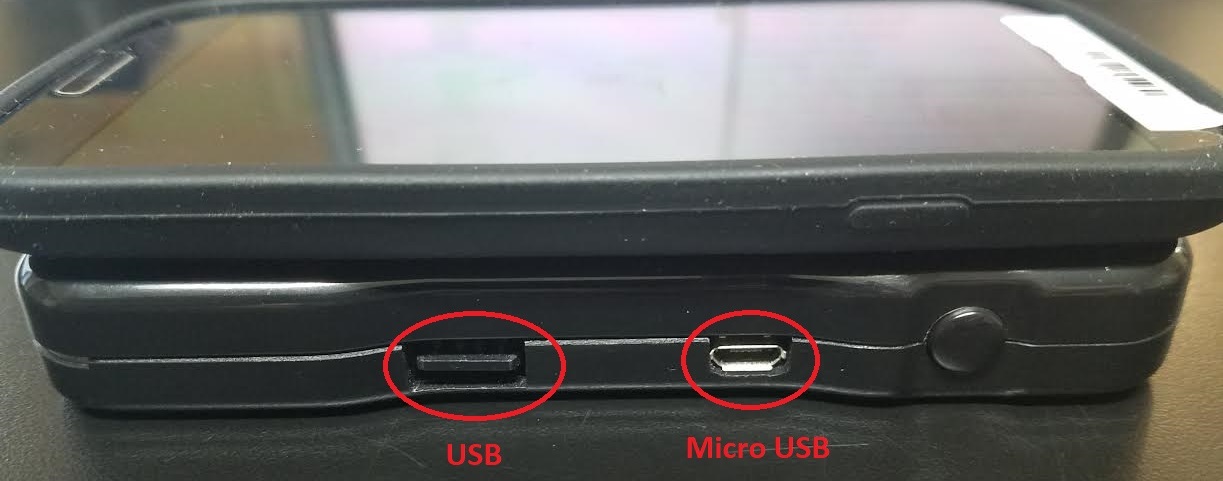
To charge the scanner, plug a micro USB into the port on the right side of the device (facing the front). When plugged in correctly you should see blue lights flashing on the back, meaning the scanner is charging. You can tell when the scanner is fully charged once you see three green lights illuminated on the back of the scanner.
-
Lights Found on the Scanner
Green Lights - Indicates how charged the scanner is. Range from one to three, three being fully charged.

Red Light - Indicates the scanner is out of charge and needs to be recharged.
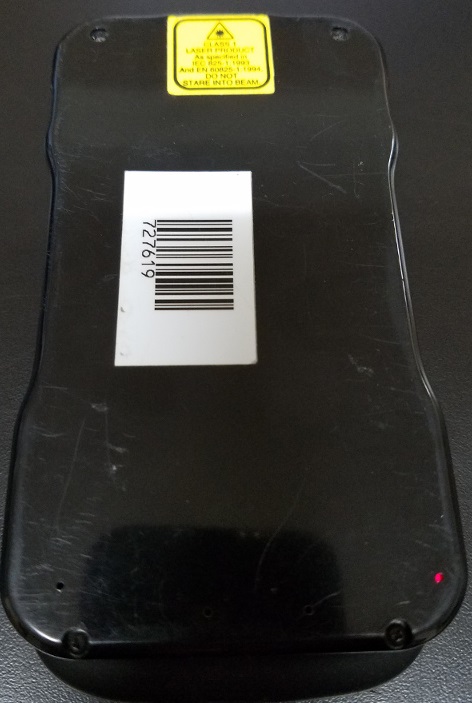
Blue Lights - Indicates the scanner is charging when plugged in.

-
Ports Found on the Scanner
The scanner has two ports located on the right side: a micro USB port used for charging the scanner and a USB port usable as a power bank if needed.
-
Laser Found on the Scanner
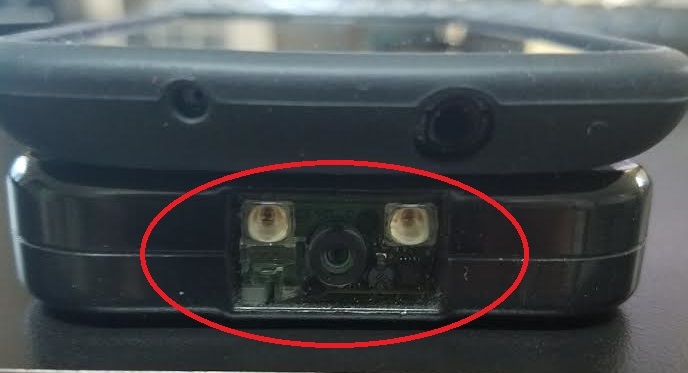
The laser is found at the front of the scanner. Point the laser toward a barcode to scan it. Never point the laser toward your eyes.
-
Enable/Disable Scanner Barcode Symbologies
This feature allows you to configure the scanner to scan different types of barcodes of your choice.
Phone
-
Charging Ports on the Phone
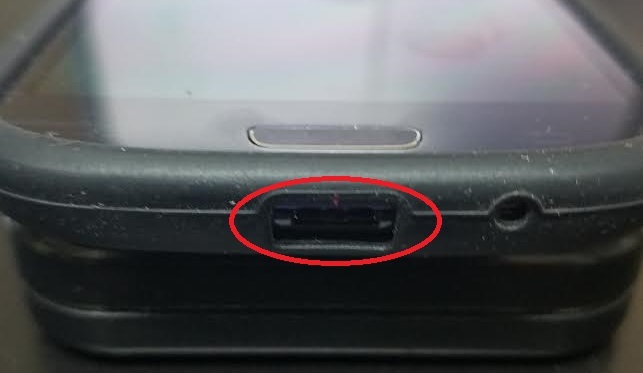
Charging ports for the phone are located at the bottom. While charging, there will be a red light in the upper right corner of the phone. Once the phone is fully charged, this light will turn green.
-
Phone is Not Charging/Powering on
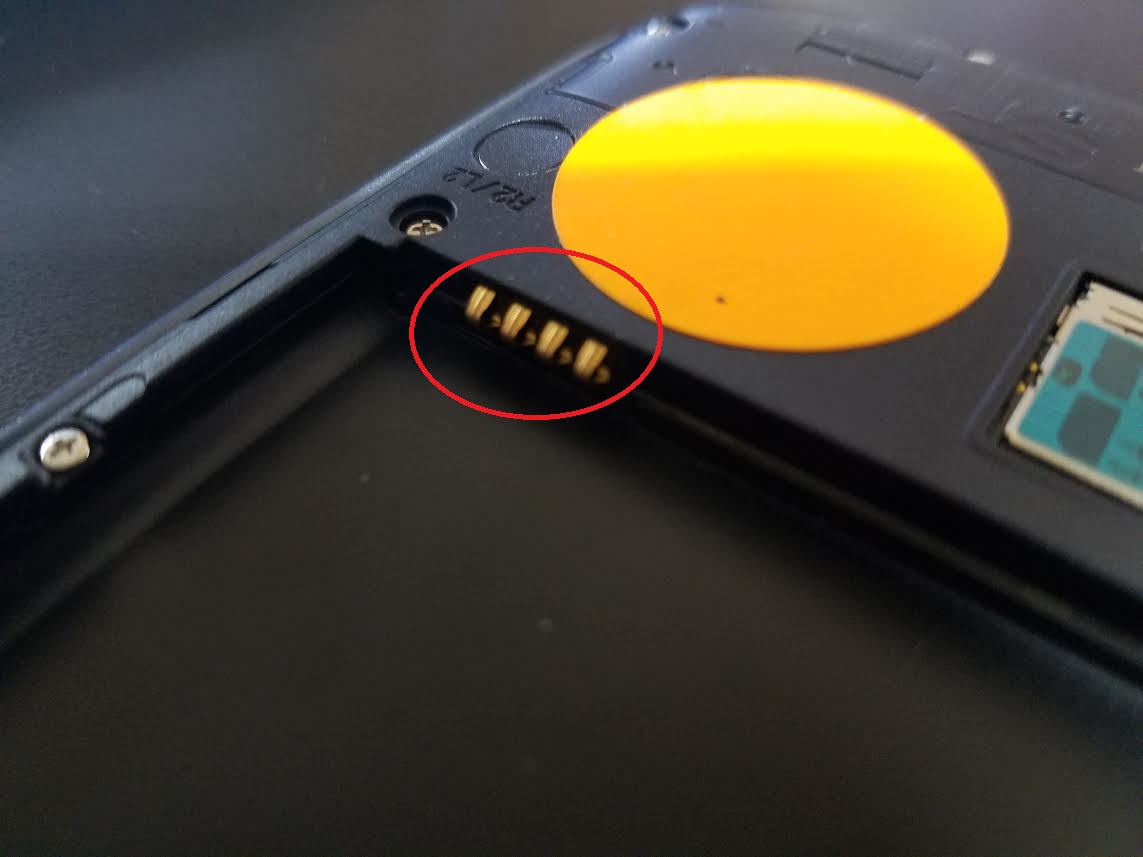
A paper blocker is placed between the battery and phone power terminals to prevent the phone from accidentally powering on during shipping. The paper blocker can sometimes be torn when trying to be removed. Leaving the terminals blocked. Follow the steps below to check the terminals on the phone.
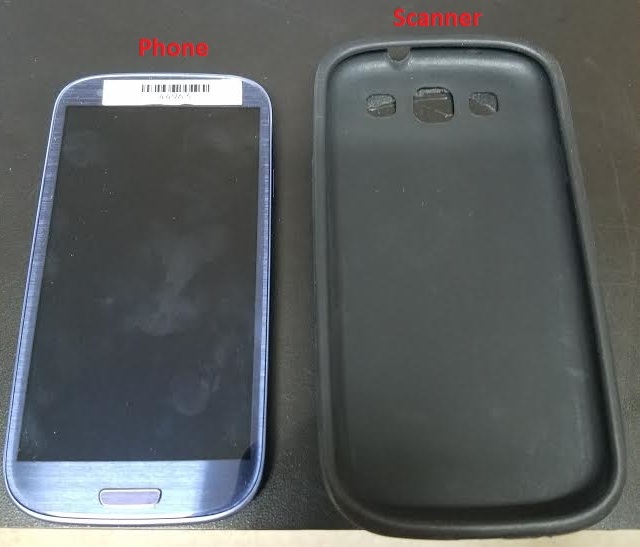
1. Remove the Phone From the Case
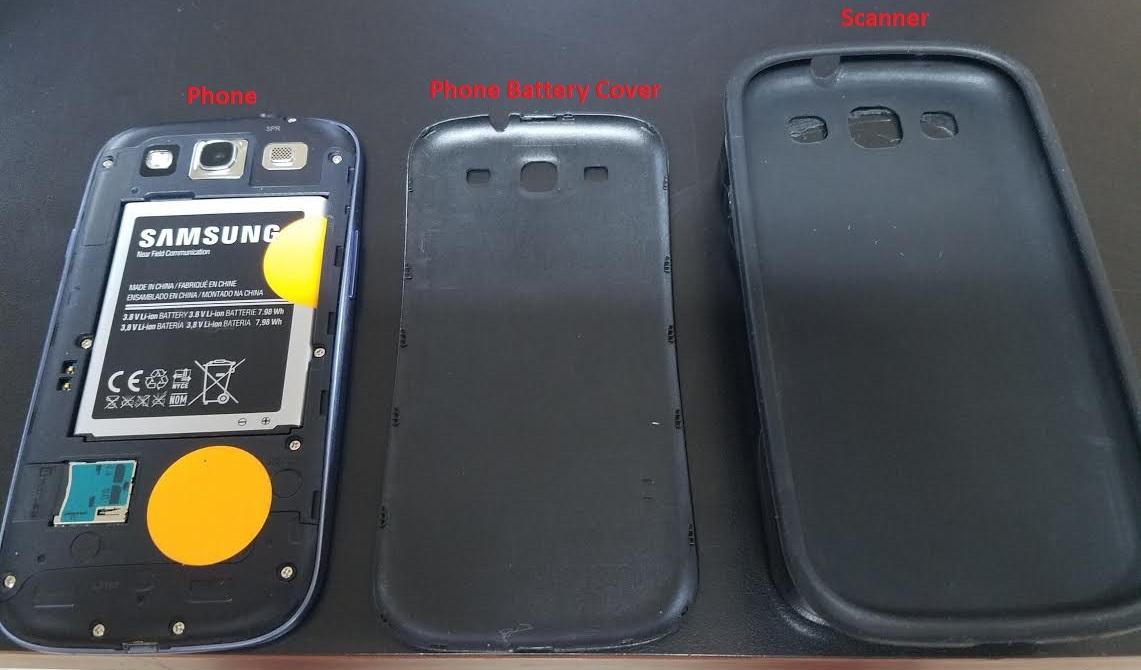
2. Take the back off of the phone
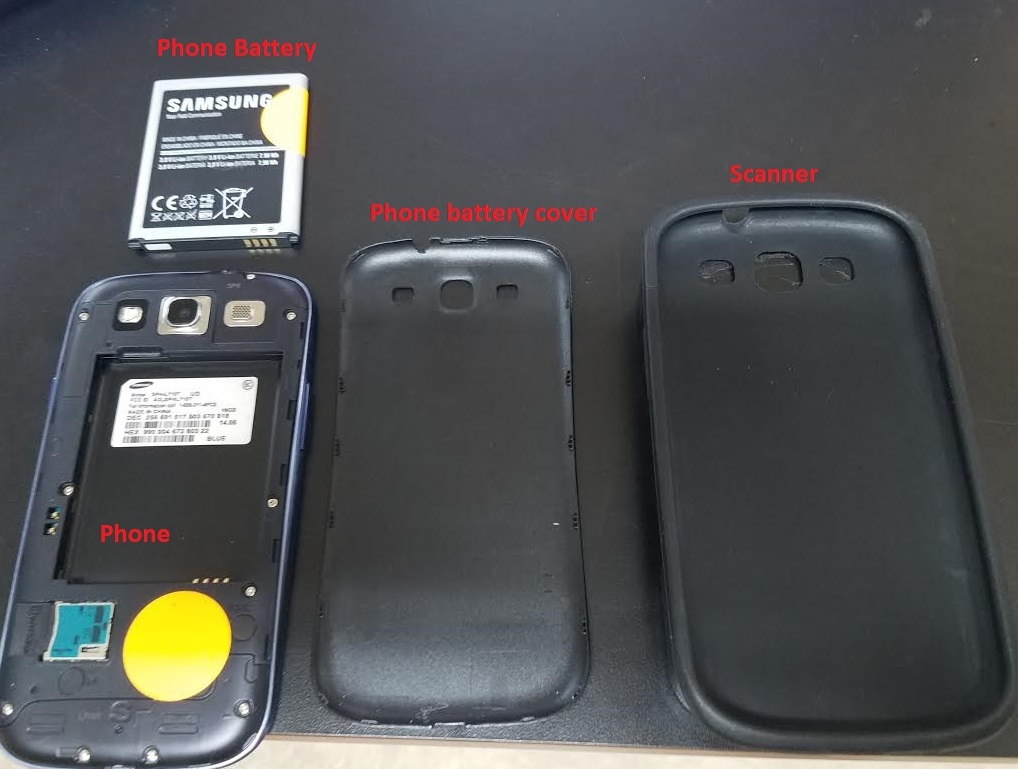
3. Remove the battery
4. Wipe the connector pins with your finger to remove any residue that my be stuck to them
5. Place back the battery and phone backing
6. If the phone still does not charge, try another phone charger
-
Enabling Wi-Fi
Use the following guide to enable the Wi-Fi antena on a EventNeat configured phone.
-
Manually Select a Network
International SIM cards might need a cellular network manually selected. This might have been done automatically by the phone depending on the cellular carrier and country. Refer to the guide to manually select a cellular network.
-
Enable/Open Internet Browser
Some Wi-Fi networks require additional steps to obtain internet access. Use the following guide to locate the internet browser on a EventNeat configured phone.
SwiftLeads
-
Unique Booth Leads
This parameter will configure the SwiftLeads app to check the server to see if the captured record has already been captured by another device at the same booth. The app uses the Company/Booth assignment to determine which devices are at a given booth. There are four methods of assigning the Company/Booth to a device. Refer to FAQ document SwiftLeads Company/Booth Assignment for in depth instructions.
-
How to Set Up a Show on a Device
Upon receiving your setup barcode from EventNeat, you will need to configure your show through the exhibitor portal. Use the following document to guide you through the process.
-
Enabling a Sponsor Logo on SwiftLeads
Use the following guide to display your own logo within the SwiftLeads app.
-
Event Creator
-
Event Creator Manual
The following manual provides an overview of the Event Wizard.
-
vCard Barcode Type
The following document provides a guide to set up vCard barcodes.
-
Field Images
Field images allow an image to be encoded in registration field data and displayed in the SwiftLeads app or made available for download in the Reporting Portal. Images can be imported into EventNeat using three different methods: URL linked, Base64 encoding, or automatically downloaded from a supported registration API. The method doesn’t affect how the images are displayed throughout the system; all methods result in the same behavior.
- DEPRECATED: How to Create a Show
-
DEPRECATED: How to Create a Setup File
1. Log in to “Event Setup”
2. From the orange menu on the right of the screen, select “Create/Edit Setup File”
3. Tick “Create” and enter the setup file name you wish to use. We recommend using the same name for the setup file that you used for the event.
4. ***NRT Enabled Event Only: Indicate whether the NRT show data is offline or online. Online means that the scanner will go to the server to get full information on each attendee as they are scanned, and all the information will appear on the screen. Offline means that the device won’t go to the server for full data as users scan badges. Only the information encoded in the badge barcode will be visible on the screen. The full data will only be downloaded later when the user logs into the server.
5. Select your Field Delimiter.
6. Select any Discard Codes. (These characters will be removed from any captured data. Common discard codes are null(0x00), start(0x02) and end(0x03) characters.)
7. Set the automatic timers to determine when the scanner will automatically power off due to inactivity so as to preserve battery power. (The recommended timeout is 1-2 hours.)
8. Select tracking type.
9. Select record properties--click “Print on demand” to enable your customers to print out their leads. (The app must be coupled with a EventNeat bluetooth printer.)
10. Press the “Next” button at the top of the page.
11. On the next page you will create the Badge Field Layout. You can select generic fields by highlighting them and clicking “Add to Field Sequence.” The fields will appear in the Field Sequence box on the right.
12. Under custom fields you can create personalized fields in the text box. Click “Add” to add each custom field to the lower custom field box. When you have created all your custom fields, click “Add to Field Sequence.” These fields will now appear in the Field Sequence box on the right.
13. When you have added fields to the Field Sequence box you can highlight two or more fields and click “Concatenate” to combine these fields onto one line.
14. Now, highlight fields and click “Download Sequence” to determine the information that the exhibitor will download from the web portal.
15. Highlight fields and click “Screen Sequence” to determine the information that will appear on the device screen when a badge is scanned.
16. Highlight fields and click “Web Sequence” to determine the information that the will be displayed in the web portal.
17. Select the order that information should be encoded in the barcode by using the “Up,” “Down,” and “Delete” buttons to edit the order of the fields.
18. Press the “Next” button at the top of the screen.
19. On the next screen you will save your file by clicking “Save” or “Save As” to save an existing setup file as another name.
- DEPRECATED: How to Associate a Show with a Setup File
SwiftLeads App for Android
-
Basic Use of the SwiftLeads App for Android
The following document covers the basic usage of the Android SwiftLeads App.
-
Advanced Use of the SwiftLeads App for Android
The following document covers advanced usage of the Android SwiftLeads App.
-
Working With Sessions
The following document provides instructions on how to use the session tracking function within the SwiftLeads app.
-
How to Override Access Control
This feature allows the user to override Access Control if the attendee’s badge scans ‘Access Denied’. The following document explains how to override the denied scan.
-
Flashing Red Banner at the Bottom of Screen
If you are seeing a flashing red banner at the bottom of the screen, this means that the device does not have a file containing the device ID. Notice at the bottom of the screen, the device says "ID: Pending". To resolve this issue follow the following steps:
1. Press and hold the red banner at the bottom of the screen.
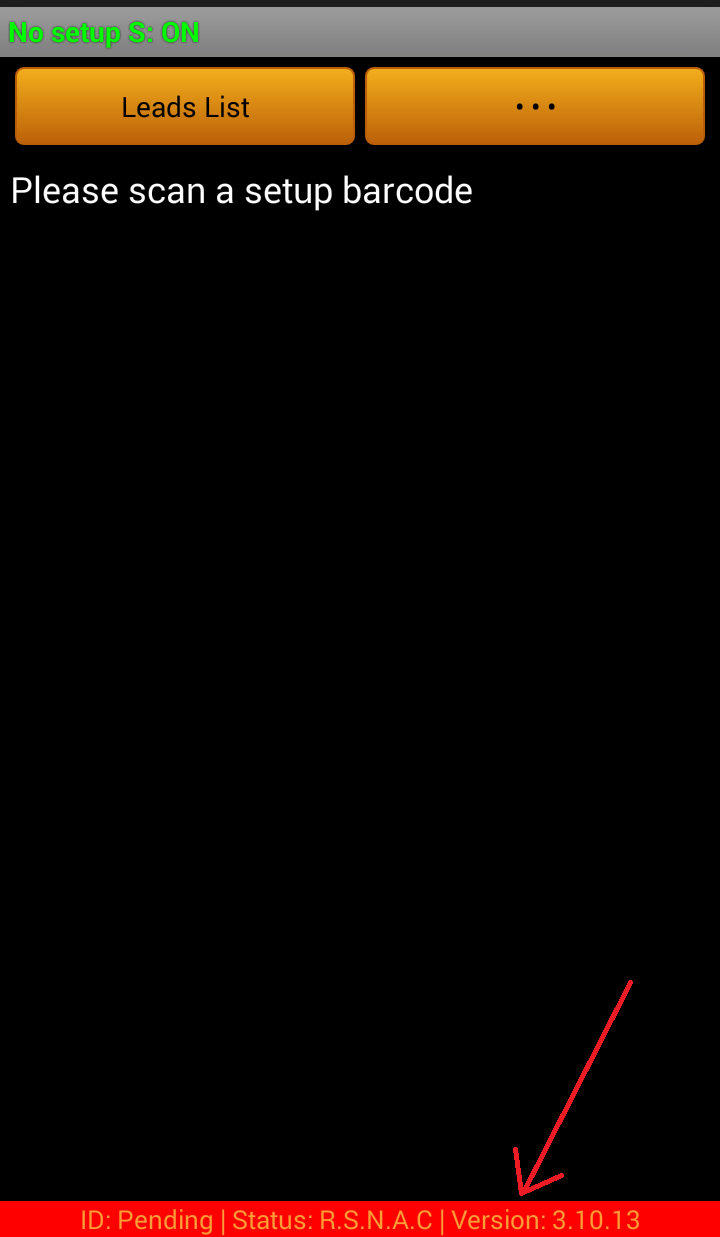
2. Enter the ID of the device into the pop-up window. - The device's ID is simply the number below the barcode on the phone.
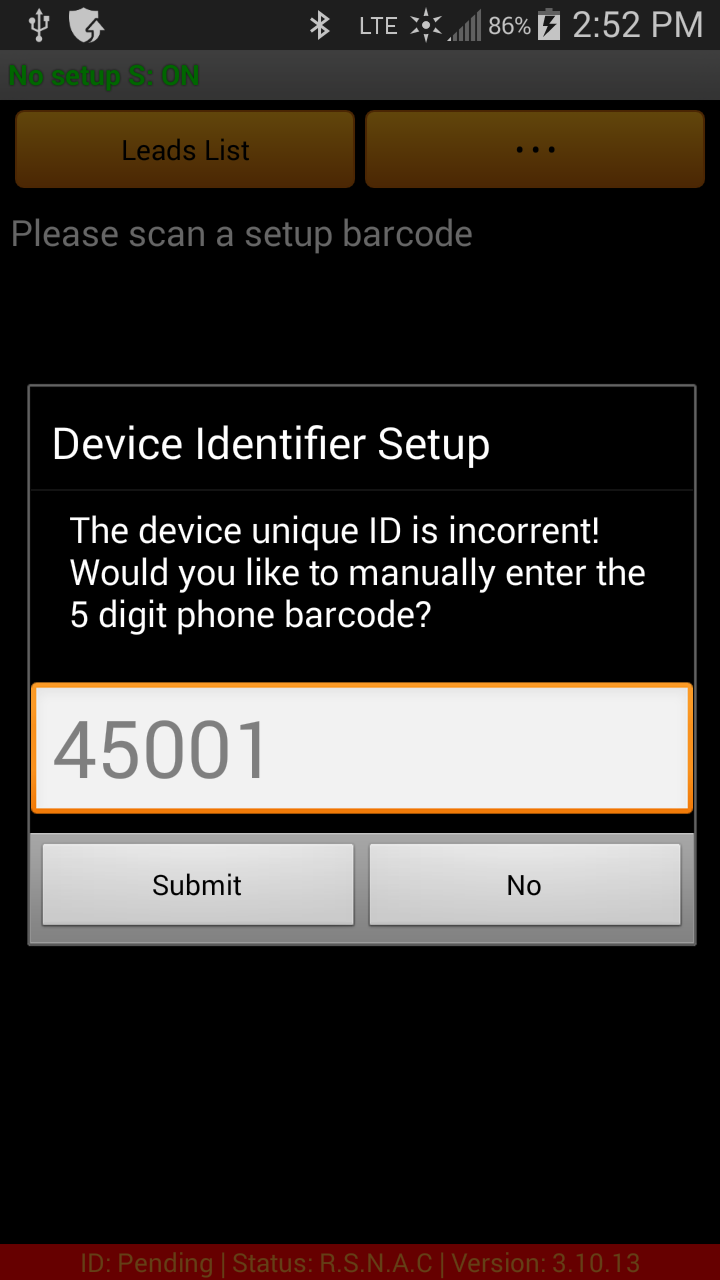
3. Press Submit
4. The device will no longer have the flashing banner and will have an ID number at the bottom of the screen. -
Compare Barcode Feature
The following document provides instructions on how to use the Compare Barcode Feature.
-
Syncing Leads to the Server
This document provides the necessary steps in order to ensure all leads are synced within the server. Additionally, it informs the user how to re-send them.
-
How to Lock/Unlock the Session Selection Box
To do so simply press the lock icon in the bottom right repeatedly until the device tells you that the session selection box has been unlocked. To re-lock the screen, it is the same process.
-
Downloading a Local Snapshot on the Device
This feature allows the user to download local snapshots either automatically or manually. This document provides steps on how to download the local database on a device.
-
View a Device's User Login Credentials
There are multiple methods to retrieve a user’s login credentials. The following document guides the user on where to find credentials within their device.
SwiftLeads App for iPhone
-
How to Download SwifLeads for iPhone
1. Go to the App Store
2. Search for SwiftLeads
3. Download the SwiftLeads App
-
How to Set Up SwiftLeads on iPhone
In order to setup SwiftLeads, you must have a SwiftLeads license activation code. The following document explains how to set up a show on your device.
Mobile Web App
-
Overview
This feature can be accessed through EventNeat.com on your mobile device by selecting Event Overview Mobile App from the dropdown menu.
The Event Overview app is a convenient way for event staff to monitor session tracking onsite by displaying check-ins and participation stats for the event.
This app features a Checked in/Registered bar as well as a chart displaying the current ratio of checked in session stats.
-
How to Use the Mobile Web App
The Event Overview App is a convenient way for event staff to monitor session tracking onsite by displaying check-ins and participation stats for the event. The following document provides information on how this feature can be accessed.
Onsite Inventory
-
What is the onsite inventory?
The free EventNeat Onsite Inventory is a web based inventory management software that streamlines the onsite process by striving to remove human error from inventory management as much as possible. Keep track of customer purchases, contact information and onsite rented equipment. Highly customizable product list, email, SMS, reports and receipts. Integrated with Tropo SMS and MapYourShow.
-
Create an Onsite Inventory Event
In order to create an Onsite Inventory Event, you must use the Exhibitor Portal. The following document explains how to use this feature.
-
Custom Customer Fields
Create custom fields that can be used to record information about customers. Fields are defined on a per Event basis. Optionally, a set of default custom fields can be defined. This set of fields will automatically be added to newly created Events. This will save time for the fields that are applied to all Events. There is no limit on the number of custom fields an Event can have.
-
Email Templates
A set of custom email templates can be created that can be used to send emails to customers on demand. The templates are HTML based allow for a highly customized email message. Templates can be created on an Event level or an Account Level. Account level templates can be copied to the Event level. This allows for adjustments to the templates for a specific Event without effecting the Account level template. Events that do not define any email templates will automatically inherit the Account level templates. This inheritance is by reference; meaning changes to an Account templates will have the same changes to Events that are inheriting the template.
-
Receipt Print Template
The onsite inventory has the option to print a receipt for a customer profile. This receipt could contain information to access leads or other forms of instructions.
-
Products
Products are a simple mechanism that houses the quantity a customer is supposed to receive. These product quantities can be altered at anytime from anywhere due to the inventory system being available on all internet enabled devices. Currently, products are only used for reference for onsite staff.
-
Sub Accounts
Create an unlimited number of accounts for members of your company; giving them access to onsite inventory events you assign to their account.
- Bulk Create/Delete Customer Information
-
When I try to create my credentials within credential management it says the username already exists?
This could be due to the fact that the username is indeed already taken. The username is premade, however does not check if the username has already been used in the system. If you run into this issue, simply put a "1,2,3,..." at the end of the username until it allows you to create your credentials.
-
How to use License System with Onsite Inventory
1. Import/Create all exhibitors in the inventory.
1.1 An email must be provided for each exhibitor in order for a license to be created.
2. Navigate to the management page of the inventory.
3. Scroll to the Create all Exhibitors a SwiftLeads License section.
4. Press the button Create Licenses.
5. A license will be created for all exhibitors that met the requirements.
6. The licenses are created with 1 use.
7. Products have been designated allow for particular license properties to be automatically configured when importing exhibitors. Optionally, specify these products in the inventory setup.
7.1 “Licenses” => # of License Activations
7.2 “Qualifiers” => Allow exhibitor to configure qualifiers
7.3 “Email Blast” => Allow exhibitor to configure email blast
Having this product defined in the event allows for an easier event setup. The products are optional and all aspects of the license can be manually configured.
-
Onsite Inventory Background Search
Search for an inventory customer from anywhere in the checkout window by typing the search term in while the cursor is not focused in a text box. Typing can be substituted with a keyboard wedge scanner; allowing for a barcode, with the search term encoded, to be scanned. Thus, quickly bringing up the customers record.
Aventri
-
Calculate an attendee's time spent in session
Using the SwiftLeads app, the total time an attendee spent in a session can be calculated. This calculated value is stored in an active question in the attendee profile. The time spent in a session is represented in minutes. In addition, the first IN and last OUT timestamps can be stored in an active question. All three potential values can be used independently of each other. For example, only the first IN timestamp might be required for an event. Instead of creating an active question for all three values, only one active question needs to be created. Saving time during the setup process and allowing the system to be more flexible.
- How do I set up a session sync?
- How Do I Enable a Timestamp on Scan Within Aventri?
-
How Do I Enable In/Out Timestamps?
To set up this feature, you must follow the same steps as enabling a timestamp on scan with one change. You must duplicate your session list and make one copy of the session say IN and the other say OUT. For example: Dinner Banquet - IN, Dinner Banquet - OUT.
- Access Control By Session Registration
- Access Control By Registration Type
-
What are the minimum required barcode fields?
The only field that is absolutely required within the barcode is the eTocuhes confirmation number.
Reporting Portal
-
How to Download Records After the Show
The following document provides the user information on how to download the leads from a show once it ends.
- How to Create an Ad Hoc Report
-
How to Modify a Record in the Reporting Portal
Modifications to captured transactions can be made in the reporting portal. The following document provides the user with a manual on how to navigate the reporting portal.
-
How to Delete a Record in the Reporting Portal
1. Navigate to the reporting portal for your show.
2. Click on the Leads tab at the top of the screen.
3. Right click the lead you would like to delete.
4. Click Delete.
-
How to Import Leads Into SalesForce
In order to use the import wizard you must log into SalesForce by using your username, password, and account key. The following document explains how to import your captured leads into SalesForce.
-
Exhibitor's Leads Are Not Appearing on the Leads Portal
If you log into the reporting portal and are not seeing your leads, there may be an issue regarding device association within the onsite inventory. To make sure this has been set up correctly, please view the attached PDF and scroll to the Credendial Device Management section.
Management Portal
-
How to Upload and Manage Sessions
The following document explains how to upload a session list and make changes to it.
-
How to set up a vCard/MeCard
The following document explains how to setup a show that uses either a vCard or a MeCard.
-
Snapshot Field Selector
The snapshot field selector allows the user to decide what data they would like to have available on the device upon scanning a barcode. The following document explains how to access the snapshot filed selector.
-
CEU Credits Report
Scans Before Session Start --> If the attendee was scanned before the session start time then the session start time will be used as the attendee scan. Rather than the actual scan time. As this would give an unfair advantage to attendees who arrived before the session started.
Scans After Session End --> If the attendee was scanned out after the session end time then the session end time will be used in place of the attendees scan out time.
Duplicate Scan Handling --> Duplicates scans of an attendee will be deduped by removing scan times that take place within in a minute of each other.
Credits For Attending Session --> In the case where attendees are only scanned into a session, the time spent will be calculated based on when the attendee was scanned in and when the session ends.
Formula: ( Session_End_Time - Attendee_CheckIn_Time )
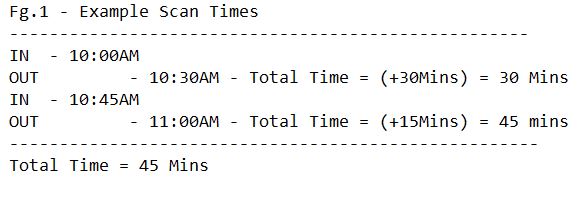
In/Out Scan Handling --> In the case where attendees are scanned in then out of a session, the time spent will be calculated based on groups of two scans (Figure 1). If an attendee never got scanned out then the missing scan will be subsituted with the session end time (Figure 2).

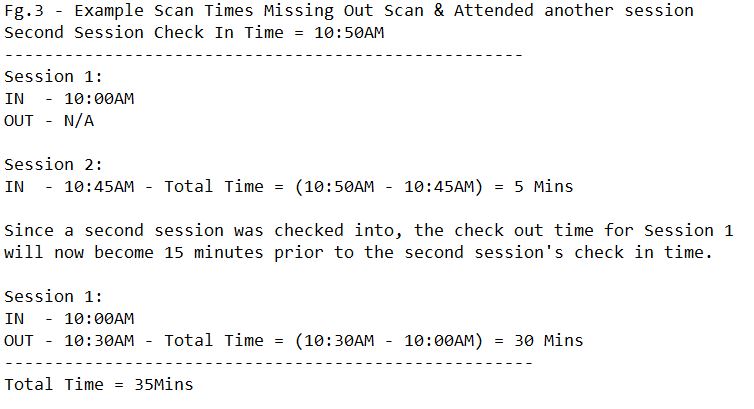
Credits For Time Spent In Session --> If an attendee checked into a session then left without getting checked out and attended a second session while the first session was still in progress. Instead of subsituting the missing out scan with the first session end time. The missing out scan will be subsituted with the time the attendee checked in to the second session (Figure 3).
-
How to Enable Lead Forwarding
Lead Forwarding allows users to send their leads to their own servers. The following document explains how to enable the lead forwarding feature.
-
Device Parameters
Device Parameters allow for detailed customization. The following documents explain how to enable these parameters.
Parameter: Access Control Session Suggestion
-
How to Delete all leads
The following document explains how to delete all leads on an individual device
-
How to Configure the Leads Portal
Portal configuration allows the user to tailor the portal to the exact way they would like it to look and function. The following document explains how to access this feature.
-
How to Edit Field Views
Field Views define which fields are viewable in the portal to the user. The following document explains how to edit and manage these field views.
Portal, Viewable, Edit, View, Manage, Device
-
Creating Setup File Packages
Setup file packages define the restrictions of a SwiftLeads license. The following document explains where to access the setup file.
-
Registration Data Management
Registration data management allows user to manually enter/upload registration data into the server.
User Management
-
How to Create a User
The following document explains how to create a user for an event.
-
Generating Access Tokens
Access tokens allow users to revisit a show once it has expired. The following document explains how to generate and use access tokens.
-
Editing User Permissions
User management allows users to edit the permissions, credentials, and device associations of a user. The following document explains how to access and edit user permissions.
-
How to Associate Devices with a User
The following document explains how to associate specific devices with an individual user.
SwiftLeads Licenses
-
How to Create/Manage Licenses
The following document explains where to locate the SwiftLeads Application Devices Manager and how to navigate through the feature.
-
How to Create/Edit an Email Blast
The Email blast feature, when enabled, sends an email to an attendee when they are scanned. The following document explains how to enable this feature and create an Email template.
-
How to Create/Edit Qualifiers
This feature allows the user to customize the email that is sent to exhibitors when emailing out licenses. The following document further explains how to access this tab in the portal.
-
How to Configure a License Email Template
This feature allows the user to customize the email that is sent to exhibitors when emailing out licenses. The following document further explains how to access this tab in the portal.
Please refer to section 4 of the attached document.
-
How to Add an Image to a License Email Template
The following document explains how to insert an image to an email template.
-
E-Literature Email Template
Exhibitors Allowed To Configure A Custom Template --> Exhibitors may create a custom email template for their license if the option to allow a custom email template is enabled in their setup file package.
Show Management Creates A Default Template For All Exhibitors --> The default show license email template can be used for all licenses that specify the override with the default template option in their setup file package.
Email Template PlaceHolder Tags --> Optionally, any of the below placeholders can be used throughout the subject and body of the email template.
- [FNAME] - Attendee's First Name
- [LNAME] - Attendee's Last Name
- [EXHIBITOR] - The name of the Exhibitor who captured the lead. This name might not be available unless the company/booth was set manually on the device or the onsite inventory pushed the name to the EventNeat server.
- [COLLATERAL] - A list of requested collateral in the form of web links.
Map Your Show
-
How to Set up Integration
Setting Up the Integration:
1. Log into the EventNeat Web Portal.
2. Select Event and click the manage show configuration.
3. Under Setup File Menu, choose Integrations
4. Enter MYS API credentials
5. Press Save
-
How to Set up Onsite Inventory
Setting up the Onsite Inventory:
1. Enter the OSI Management Portal from the EventNeat Web Portal
2. Select the inventory show
3. Check the Enable Map Your Show API
4. Press Save
5. Navigate to the onsite inventory
6. Select the inventory show
7. Enter the onsite management page
8. Locate the Map Your Show Exhibitor Import panel
9. Enter MYS API credentials and Press Import
10. Create a custom credential for the exhibitor and associate checked out devices.
11. Exhibitor will now be able to access leads portal from a MYS GUID encoded URL.
Registration Data Matcher
-
How to Generate an API Key
pending doc
-
How to Match an ID to Full Registration Data
The following document explains how to match NRT data.
Purchase Orders
-
Order Form Downlaods
Experient
SS
Expo
Aventri
Generic
-
How to Adjust an Order
Pending Doc
-
Get Tracking Numbers
Pending Doc
Setup File & Session Attendance Types
-
None / Lead Retrieval
Capture and follow-up on leads generated at an event.
-
Session Attendance Tracking
Tracks the attendance of sessions. Generates a list of attendees that have attended sessions at an event.
-
Access Control
* This is a child feature of Session Attendance Tracking. Thus inheriting all of its features.
Uses a unique access token bound to attendees to dictate whether access should be granted or denied to particular sessions for that attendee.
Access Control Modes:
0-Z
Hexadecimal
Indexed
Binary
Ask an EventNeat representative about access control token generation. The EventNeat system supports 4 different token types.
-
Already Tagged
* This is a child feature of Session Attendance Tracking. Thus inheriting all of its features.
Prevents a barcode from being scanned multiple times into the same session. When a barcode is scanned for the first time by a device, it creates an entry on the server. The next time the same barcode is scanned, the device will check the server to see if the barcode has been scanned. If it has been, the device will light up saying that the barcode has been previously scanned.
When testing with this feature is important to note that you must delete your device scans as well as server scans to ensure that barcodes will not be marked as already tagged at your event due to the test scans.
In the setup file creator this feature will be labeled as follows: [Already Tagged] Note this feature can be applied to both Session Tracking and Access Control setup file types.
-
Access Control + Already Tagged
* This is a child feature of Session Attendance Tracking. Thus inheriting all of its features.
This feature combines the uses of access control as well as already tagged. This means an attendee must be granted access to a session or event and will only be allowed access one time before they are marked as already tagged.
-
Ticketing
* This is a child feature of Session Attendance Tracking. Thus inheriting all of its features.
Ticketing mode utilizes the access control and already tagged features to determine which sessions a ticket is granted to through the use of a ticket allowance.There are two types of ticketing modes EventNeat offers. The first is Event Ticket Mode and the other is Session Ticket Mode. Both modes are similar in many ways. The only difference is when the ticket usage is reset by the system.
Event Ticket Mode
A ticket will be allowed access to n number of sessions, but may only access each session one time. Any further attempts within the same session will be declined.
For example: There is an event that runs for 3 days (each day represents a session). If an attendee purchases a ticket valid for the first 2 days, they will be granted to those days; however, they can only be granted once each day. The third day, the attendee will be declined.
Session Ticket Mode
Each ticket may be granted access to a session n number of times. A ticket's allowance is not effected by other session scans.
For example: There is an event that runs for 3 days (each day represents a session). If an attendee purchases a ticket that has an allowance of 2, they are allowed access twice to each session they are registered for (registration utilizes access control).
Notes
The ticket allowance is housed in the zip code generic field located in the setup file creator.
The setup file Session Attendance Tracking Type must be Access Control: Hexadecimal [Already Tagged]
The desired ticket mode must be choosen by enabling it in the device parameters as it is an option for the device and not the setup file configuration.
EventNeat Integrations
-
Integration Types
[R] - Registration Data Sync
Newly created/modified registrants will automatically be synced with the EventNeat system, allowing the EventNeat portal report to have the most up to date registration information.
[A] - Session Access Control By Session Registration
Generate a EventNeat Access Control Token for each registrant based on their session selections. The access control token is saved in the EventNeat database for later use with the SwiftLeads App.
[T] - Session Access Control By Registration Type
Generate a EventNeat Access Control Token for each registrant based on their registration type. The access control token is saved in the EventNeat database for later use with the SwiftLeads App.
[S] - Session Check-In
When registrants are scanned into a session, their status is set as Attended.
[E] - Event Check-In
When an attendee is scanned, the system will automatically mark their status as Attended, allowing reports of which attendees were present at the event to be run in the API host's portal.
[L] - Lead Forwarding
Forward all scans captured with the EventNeat system to the API host's platform
-
Integration Partners
Didn't find the integration you were looking for? Contact us! We integrate at no charge.
Other
-
Can I change a device's actions (LR, AC, etc.) at a show?
Yes you can! To do so, simply create a new setup file and scan it into the device you would like to change. All of the actions done by a device prior to changing it will be safe and secure on the server. If you would like to change the device back to its original task, simply scan in the old setup file.
See SwiftLeads document on how to set up a show here.
-
IFrame Partner Integration
Step 1: Create a simple html page with the code below.
Step 2: Download a jquery library or use your own
Step 3: Replace [PARTNER_CODE] in the iFrame src property with your designated partner code. Discard the brackets. (Partner code is an optional parameter and can be removed)
Step 4: Replace [Portal_Name] with the title of the web page.
Step 5: Change the page icon from the default
-
Default Show License
The default show license allows show management to configure default qualifiers/email blast to be automatically setup when the license is used for setup.
The default license is the equivalent to the legacy style setup barcodes. The major difference between the two is the license will setup qualifiers/email blast at the time of setup. Whereas the legacy setup barcode required three separate setup barcodes to achieve the same result.
-
Setting Up with a License/Email (App Store)
1. The exhibitor will have the option to either enter their email that has a license associated with it or use the phone camera to scan the license activation code.
2. The license activation code can be found in the email that was sent to them when the license was configured by a EventNeat manager account.
-
Setting Up with a License (Non-App Store)
1. Scan the 8-character license activation code. This may be an exhibitor or show default license activation code.
2. Upon setup qualifiers and/or email blast that have been configured will automatically setup.
-
Exhibitor Qualifiers/Email Blast Configuration
1. A link will be made available to the exhibitor that will allow customization of their qualifiers and e-literature.
2. E-literature can be associated with qualifier answers in the form of a URL or a file.
3. Upon qualifying an attendee with answers that have e-literature associated; an email will automatically be sent to the attendee. This email will contain links to the URL or file that was associated with the answers.
4. The email may be customized to the exhibitors liking through the qualifier configuration tool.
5. Exhibitors have the ability to track which attendees opened e-literature through their reporting portal.


